
Deploying a RAG Chatbot on AWS with Terraform
Most people talk about RAG like the model is the system.
It isn’t.
The real system is everything around it: networking, private connectivity, containers, IAM, databases, deployment flows, and the boring infrastructure details that decide whether your app actually works in production.
This guide takes the original AWS + Terraform walkthrough and refines it into a clearer, sharper, SpaceSlam-style engineering breakdown.
Instead of just repeating Terraform blocks, we focus on why each piece exists, how the architecture fits together, and what matters if you want to build something real.
#What We Are Actually Building
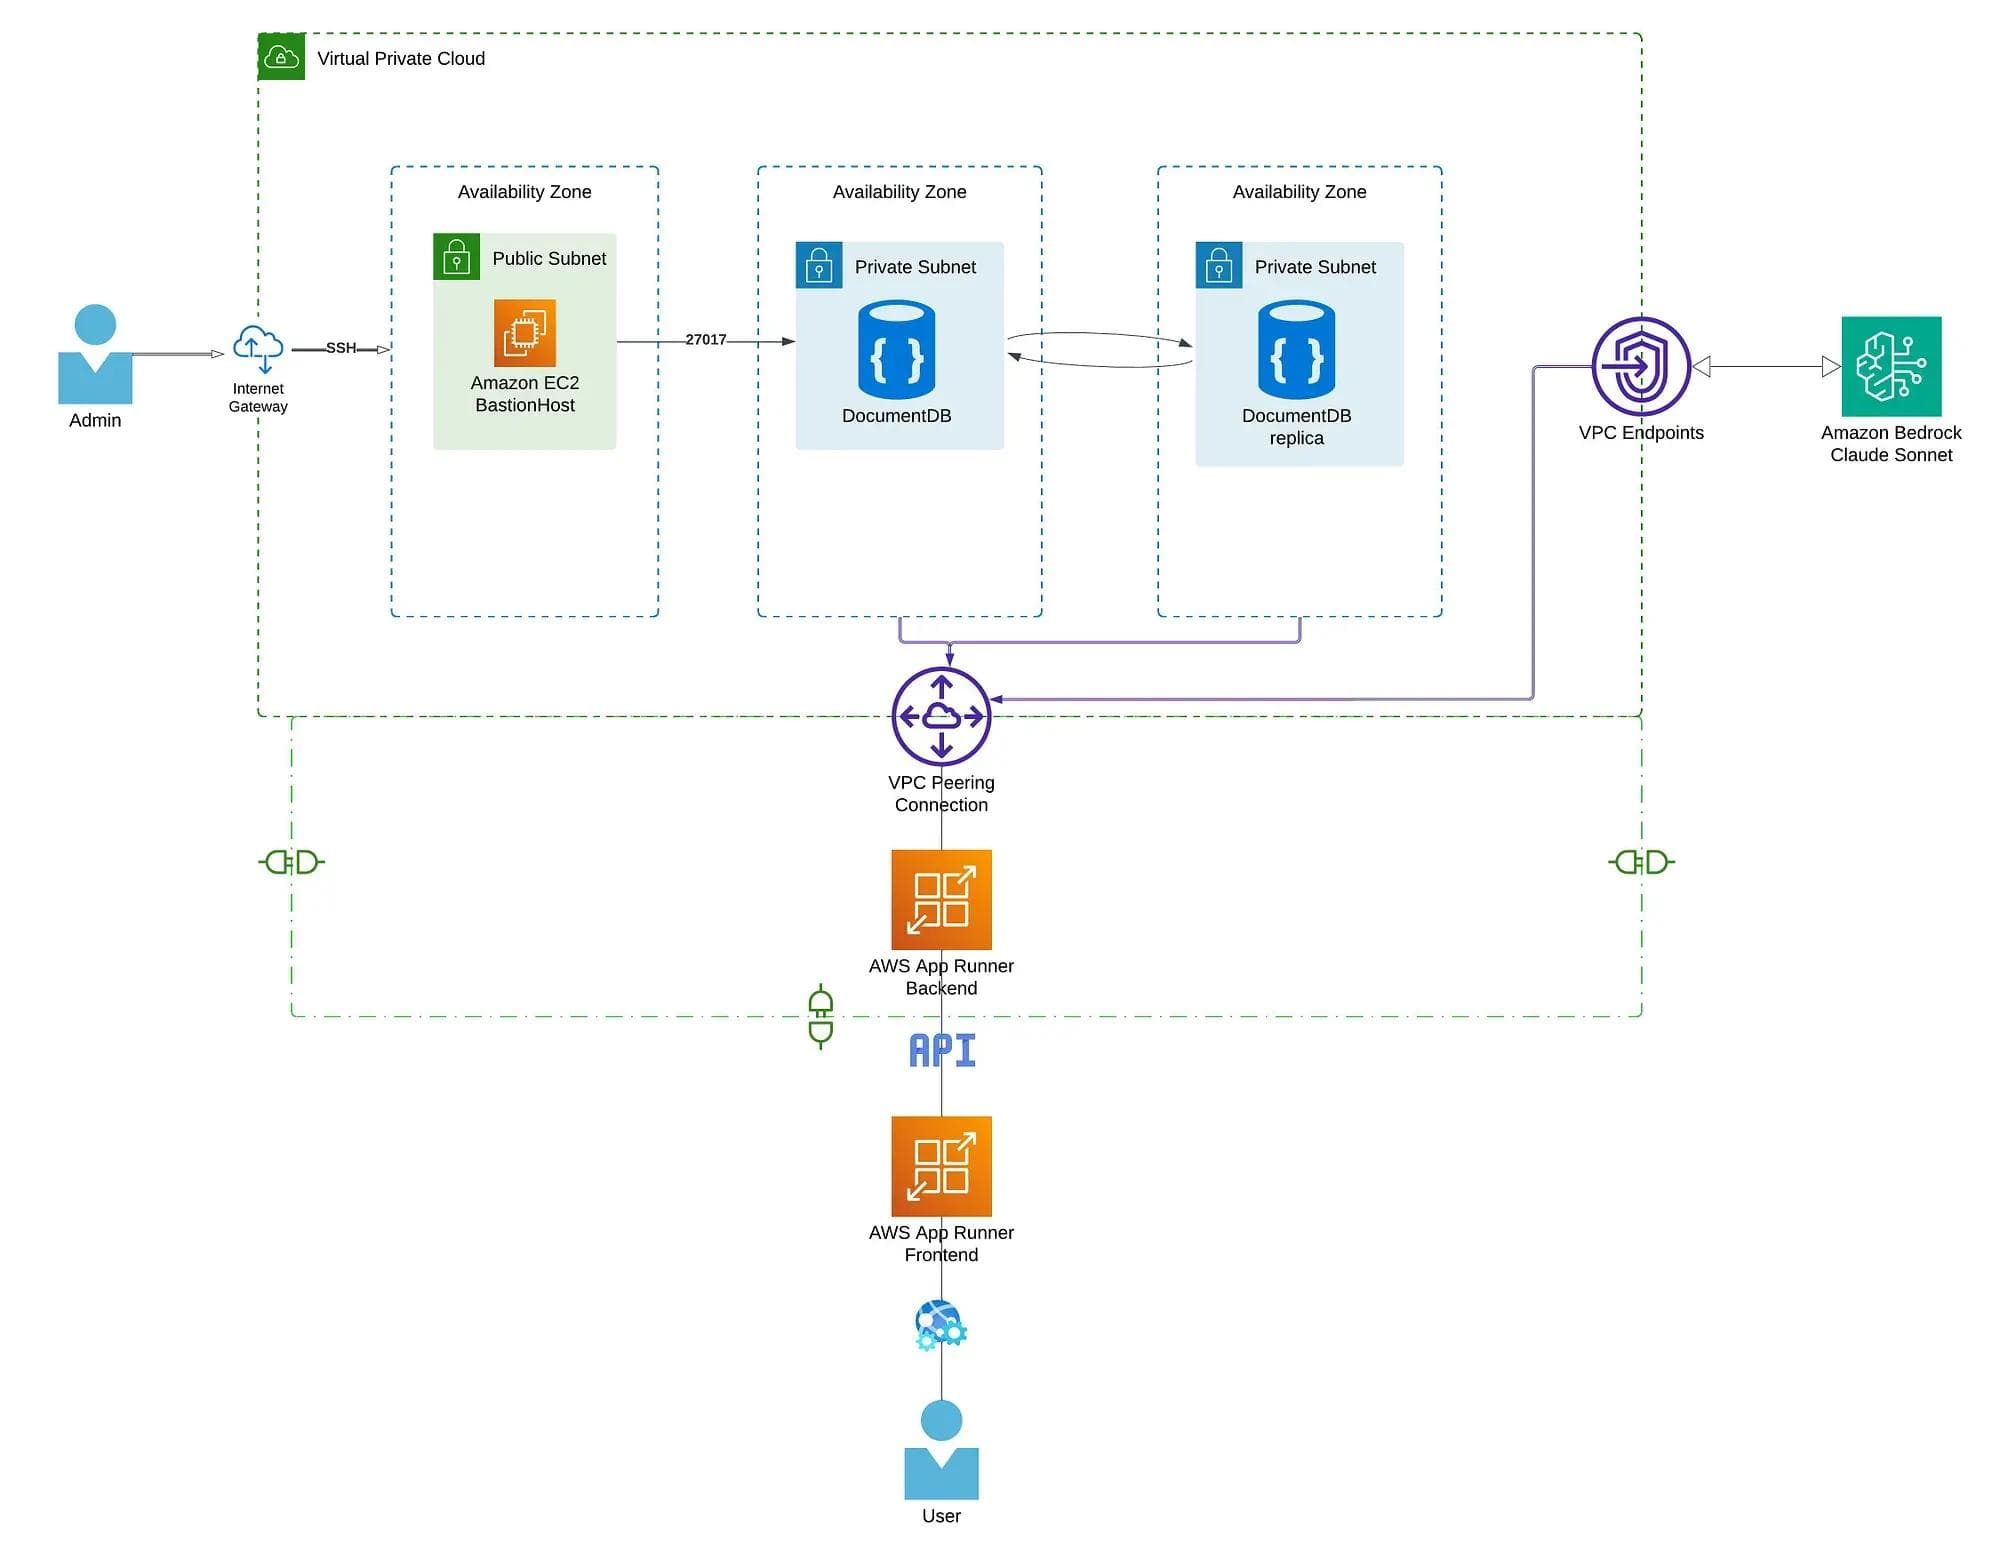
That includes:
- a custom VPC
- public and private subnets
- an Internet Gateway and route tables
- Security Groups
- an EC2 Bastion Host
- an Amazon DocumentDB cluster
- AWS App Runner for backend and frontend services
- a VPC Connector so App Runner can reach private resources
- a Bedrock interface VPC endpoint for private model access
The point is not just “infrastructure as code.”
The point is this: you want the whole system to be reproducible, reviewable, secure, and easy to evolve.
That is what Terraform gives you when used properly.
#High-Level Architecture
Here is the mental model:
- The frontend is public.
- The backend is deployed with App Runner.
- The database lives in private subnets.
- A bastion host gives controlled admin access.
- Bedrock is reached privately through a VPC endpoint.
- Terraform wires all of it together.
So the real story is not “deploying a chatbot.”
It is: building a production-shaped AI system where the app, the data plane, and the model access path are all explicitly designed.
#Repository Structure
A clean Terraform repo usually separates concerns by resource type.
.
├── provider.tf
├── variables.tf
├── terraform.tfvars
├── vpc.tf
├── security_groups.tf
├── documentdb.tf
├── data.tf
├── bastion_host.tf
├── app_runner_back.tf
└── outputs.tf
This matters because Terraform files are not just “files.” They are your infrastructure boundaries.
A structure like this makes it easier to reason about:
- networking
- security
- compute
- database
- deployment
- outputs
That becomes much more valuable as the project grows.
#Terraform Basics You Actually Need
Before touching the AWS resources, know these commands:
#terraform init
Initializes the working directory. It downloads providers and prepares Terraform state handling.
#terraform plan
Shows what Terraform is going to create, update, or destroy. This is your chance to catch mistakes before AWS catches your wallet.
#terraform apply
Executes the plan and provisions the resources.
#Terraform State
Terraform keeps track of what it created through a state file, usually terraform.tfstate.
That state is critical because Terraform does not “guess” infrastructure. It compares:
- what your code says should exist
- what the state says already exists
That comparison is what drives the plan.
#Resource Referencing
Terraform resources are referenced like this:
aws_vpc.chatbot_vpc.id
That means:
- resource type:
aws_vpc - local resource name:
chatbot_vpc - attribute:
id
#Variables
Variables are typically:
- declared in
variables.tf - assigned in
terraform.tfvars - referenced as
var.some_name
That lets you separate logic from environment-specific values.
1. VPC Network
This is the foundation.
If your network design is wrong, the rest of the architecture becomes a pile of workarounds.
#Create a Custom VPC
resource "aws_vpc" "chatbot_vpc" {
  cidr_block           = "172.16.0.0/16"
  instance_tenancy     = "default"
  enable_dns_support   = true
  enable_dns_hostnames = true

  tags = {
    Name = "terraform_chatbot_vpc"
  }
}
#Why it exists
A VPC is your private network boundary in AWS.
The CIDR block 172.16.0.0/16 defines the IP address space for everything inside that network.
#What matters
enable_dns_support = truelets resources resolve DNS names.enable_dns_hostnames = truehelps AWS-managed services and instances work more smoothly.- tagging is not optional if you want sane operations later.
#Public Subnet
resource "aws_subnet" "public_subnet_1" {
  vpc_id                  = aws_vpc.chatbot_vpc.id
  cidr_block              = "172.16.1.0/24"
  map_public_ip_on_launch = true
  availability_zone       = "eu-central-1a"

  tags = {
    Name = "terraform_chatbot_subnet_public1"
  }
}
#Why it exists
This is where resources that need direct internet reachability can live.
In this architecture, that mainly means the bastion host.
#Key detail
map_public_ip_on_launch = true means EC2 instances here automatically get public IPs.
#Private Subnets
resource "aws_subnet" "private_subnet_1" {
  vpc_id                  = aws_vpc.chatbot_vpc.id
  cidr_block              = "172.16.2.0/24"
  map_public_ip_on_launch = false
  availability_zone       = "eu-central-1a"

  tags = {
    Name = "terraform_chatbot_subnet_private1"
  }
}

resource "aws_subnet" "private_subnet_2" {
  vpc_id                  = aws_vpc.chatbot_vpc.id
  cidr_block              = "172.16.3.0/24"
  map_public_ip_on_launch = false
  availability_zone       = "eu-central-1b"

  tags = {
    Name = "terraform_chatbot_subnet_private2"
  }
}
#Why they exist
Private subnets are where you place resources that should not be directly exposed to the internet.
Here, that includes:
- DocumentDB
- App Runner private networking path
- Bedrock interface endpoint
#Why two subnets matter
Using subnets across different availability zones improves availability and is often required by managed services.
#Internet Gateway
resource "aws_internet_gateway" "internet_gw" {
  vpc_id = aws_vpc.chatbot_vpc.id

  tags = {
    Name = "terraform_internet_gw"
  }
}
#Why it exists
Without an Internet Gateway, your public subnet is not really public.
It gives resources in public subnets a path to the internet.
#Route Tables
#Public Route Table
resource "aws_route_table" "public_route_table" {
  vpc_id = aws_vpc.chatbot_vpc.id

  route {
    cidr_block = "0.0.0.0/0"
    gateway_id = aws_internet_gateway.internet_gw.id
  }

  tags = {
    Name = "terraform_public_rtb"
  }
}
This sends all outbound traffic to the Internet Gateway.
#Private Route Table
resource "aws_route_table" "private_route_table" {
  vpc_id = aws_vpc.chatbot_vpc.id

  tags = {
    Name = "terraform_private_rtb"
  }
}
No default internet route means the private subnet stays private.
That is exactly what you want for database infrastructure.
#Route Table Associations
resource "aws_route_table_association" "public_assoc" {
  subnet_id      = aws_subnet.public_subnet_1.id
  route_table_id = aws_route_table.public_route_table.id
}

resource "aws_route_table_association" "private_assoc_1" {
  subnet_id      = aws_subnet.private_subnet_1.id
  route_table_id = aws_route_table.private_route_table.id
}

resource "aws_route_table_association" "private_assoc_2" {
  subnet_id      = aws_subnet.private_subnet_2.id
  route_table_id = aws_route_table.private_route_table.id
}
This is the final wiring step.
Subnets do not magically inherit the right routes. You explicitly attach them.
2. Security Groups
Now we define who is allowed to talk to what.
Security groups are not just firewall rules. They are part of the system design.
#DocumentDB Security Group
resource "aws_security_group" "documentdb_sg" {
  vpc_id      = aws_vpc.chatbot_vpc.id
  name        = "documentdb_security_group"
  description = "Security group for DocumentDB"

  ingress {
    from_port       = 27017
    to_port         = 27017
    protocol        = "tcp"
    security_groups = [aws_security_group.bastion_sg.id]
  }

  egress {
    from_port   = 0
    to_port     = 0
    protocol    = "-1"
    cidr_blocks = ["0.0.0.0/0"]
  }

  tags = {
    Name = "terraform_documentdb_security_group"
  }
}
#Why this is good
Instead of allowing access from a broad IP range, it allows access only from a trusted security group.
That is a much better pattern than throwing CIDRs everywhere.
#Port 27017
That is the MongoDB-compatible port used by DocumentDB.
#Bastion Host Security Group
resource "aws_security_group" "bastion_sg" {
  vpc_id      = aws_vpc.chatbot_vpc.id
  name        = "bastion_security_group"
  description = "Security group for Bastion host"

  ingress {
    from_port   = 22
    to_port     = 22
    protocol    = "tcp"
    cidr_blocks = var.bastion_host_cidr
  }

  egress {
    from_port   = 0
    to_port     = 0
    protocol    = "-1"
    cidr_blocks = ["0.0.0.0/0"]
  }

  tags = {
    Name = "terraform_bastion_security_group"
  }
}
#Why this matters
A bastion host is already a controlled entry point. If you open SSH to the whole world, you just created a public attack surface with a fancy name.
Restrict it to a known CIDR.
3. Provisioning Amazon DocumentDB
Now we add the database layer.
For a RAG system, this is where your application might store:
- embeddings
- session data
- chat history
- metadata
#DocumentDB Subnet Group
resource "aws_docdb_subnet_group" "terraform_docdb_subnet_group" {
  name_prefix = "terraform_document_db_subnet_group"
  subnet_ids  = [
    aws_subnet.private_subnet_1.id,
    aws_subnet.private_subnet_2.id
  ]
}
#Why it exists
Managed databases need to know where they are allowed to launch. This subnet group tells DocumentDB to stay inside the private subnets.
#DocumentDB Cluster
resource "aws_docdb_cluster" "terraform_docdb" {
  cluster_identifier_prefix       = "terraform-docdb-cluster"
  db_subnet_group_name            = aws_docdb_subnet_group.terraform_docdb_subnet_group.name
  vpc_security_group_ids          = [aws_security_group.documentdb_sg.id]
  engine                          = "docdb"
  engine_version                  = "5.0.0"
  master_username                 = var.master_username
  master_password                 = var.master_password
  storage_encrypted               = true
  skip_final_snapshot             = true
}
#What matters here
- it lives in the private subnet group
- it uses the locked-down DocumentDB security group
- storage is encrypted
- credentials come from variables
#Important production note
Using raw Terraform variables for secrets is acceptable for demos. For production, use a more secure pattern such as:
- AWS Secrets Manager
- SSM Parameter Store
- external secret injection via CI/CD
Also, skip_final_snapshot = true is fine for experimentation, not for serious environments.
#DocumentDB Cluster Instance
resource "aws_docdb_cluster_instance" "terraform_cluster_instances" {
  identifier         = "terraform-docdb-cluster-instance"
  cluster_identifier = aws_docdb_cluster.terraform_docdb.id
  instance_class     = "db.t3.medium"
}
The cluster defines the database control plane. The cluster instance is the actual compute capacity running it.
4. Bastion Host (EC2)
The bastion host is your controlled admin bridge into the private side of the system.
resource "aws_instance" "terraform_bastion_host" {
  ami                    = data.aws_ami.ubuntu_ami.id
  instance_type          = "t2.small"
  key_name               = aws_key_pair.ssh_bastion.key_name
  vpc_security_group_ids = [aws_security_group.bastion_sg.id]
  subnet_id              = aws_subnet.public_subnet_1.id

  user_data = <<-EOF
    #!/bin/bash
    apt-get update
    apt-get install -y gnupg curl wget
  EOF

  tags = {
    Name = "Terraform Bastion Host"
  }
}
#Why it exists
Because your DocumentDB cluster is private. You do not SSH into the database. You SSH into the bastion, then access private resources from there.
That is the correct pattern.
#SSH Key Pair
resource "aws_key_pair" "ssh_bastion" {
  key_name   = "ssh-key"
  public_key = file("id_bastion_bayard.pub")
}
#Important rule
Never commit private keys. Ever.
#Dynamic AMI Selection
Hardcoding an AMI ID is annoying and brittle. Use a data source instead.
data "aws_ami" "ubuntu_ami" {
  most_recent = true
  owners      = ["099720109477"]

  filter {
    name   = "architecture"
    values = ["x86_64"]
  }

  filter {
    name   = "root-device-type"
    values = ["ebs"]
  }

  filter {
    name   = "virtualization-type"
    values = ["hvm"]
  }

  filter {
    name   = "name"
    values = ["ubuntu/images/hvm-ssd/ubuntu-focal-20.04-amd64-server-*"]
  }

  filter {
    name   = "state"
    values = ["available"]
  }
}
#Why this is better
This keeps the bastion image current without editing Terraform every time AMIs change.
That is exactly the kind of small decision that separates “toy infra” from something maintainable.
5. App Runner, ECR, and IAM
Now we move from infrastructure foundation to application deployment.
The application has two parts:
- backend
- frontend
The images live in ECR. The services run in App Runner.
#ECR Image URIs
You will reference image URIs like:
<account-id>.dkr.ecr.<region>.amazonaws.com/chatbot-backend:latest
<account-id>.dkr.ecr.<region>.amazonaws.com/chatbot-frontend:latest
Those are what App Runner pulls when it deploys.
#IAM Role for App Runner
App Runner needs an IAM role so it can:
- pull images from ECR
- access AWS services at runtime
- possibly call Bedrock
#Trust Policy
resource "aws_iam_role" "app_runner_build_role" {
  name = "app-runner-build-role"

  assume_role_policy = jsonencode({
    Version = "2012-10-17"
    Statement = [
      {
        Effect = "Allow"
        Principal = {
          Service = [
            "build.apprunner.amazonaws.com",
            "tasks.apprunner.amazonaws.com"
          ]
        }
        Action = "sts:AssumeRole"
      }
    ]
  })
}
#Why this matters
This does not grant permissions yet. It only says which AWS services are allowed to assume the role.
That is what a trust policy does.
#Attach Policies
#ECR Read Access
resource "aws_iam_role_policy_attachment" "ecr_readonly_attachment" {
  role       = aws_iam_role.app_runner_build_role.name
  policy_arn = "arn:aws:iam::aws:policy/AmazonEC2ContainerRegistryReadOnly"
}
#Bedrock / DocumentDB Notes
The original article attaches broad managed policies like AmazonDocDBFullAccess and AmazonBedrockFullAccess.
That works for demos, but it is too broad for good production security.
A better practice is:
- minimal ECR pull permissions
- narrow Bedrock invocation permissions
- avoid unnecessary full-access managed policies
- prefer application-level auth and network control for database access
This is one of the biggest differences between “it deploys” and “it is production-grade.”
6. App Runner Networking: Security Groups and VPC Connector
This is where the architecture becomes interesting.
By default, App Runner is not magically inside your private VPC world. If your database is private, you need a VPC connector.
#App Runner Security Group
resource "aws_security_group" "apprunner_sg" {
  name_prefix = "terraform-apprunner-sg-"
  vpc_id      = aws_vpc.chatbot_vpc.id

  egress {
    from_port   = 443
    to_port     = 443
    protocol    = "tcp"
    cidr_blocks = ["0.0.0.0/0"]
  }

  tags = {
    Name = "terraform_apprunner_security_group"
  }
}
This allows HTTPS egress, which is needed for service communication such as Bedrock access.
#DocumentDB ↔ App Runner Rules
resource "aws_security_group_rule" "documentdb_to_apprunner" {
  type                     = "ingress"
  from_port                = 27017
  to_port                  = 27017
  protocol                 = "tcp"
  security_group_id        = aws_security_group.documentdb_sg.id
  source_security_group_id = aws_security_group.apprunner_sg.id
}

resource "aws_security_group_rule" "apprunner_to_documentdb" {
  type                     = "egress"
  from_port                = 27017
  to_port                  = 27017
  protocol                 = "tcp"
  security_group_id        = aws_security_group.apprunner_sg.id
  source_security_group_id = aws_security_group.documentdb_sg.id
}
#Why this is important
This is explicit private communication.
The backend can reach the database. The database only trusts the backend security group.
That is exactly the pattern you want.
#VPC Connector
resource "aws_apprunner_vpc_connector" "connector" {
  vpc_connector_name = "terraform-app-runner-connector"

  subnets = [
    aws_subnet.private_subnet_1.id,
    aws_subnet.private_subnet_2.id
  ]

  security_groups = [
    aws_security_group.apprunner_sg.id
  ]
}
#Why it exists
Without the VPC connector, App Runner cannot privately reach resources in your VPC.
This is the bridge between your managed container service and your internal data plane.
7. Deploying the Backend with App Runner
Now we define the backend service itself.
resource "aws_apprunner_service" "terraform_app_runner_backend" {
  service_name = "terraform-app-runner-backend"

  source_configuration {
    image_repository {
      image_configuration {
        port = "8000"
        runtime_environment_variables = {
          MONGODB_HOST     = aws_docdb_cluster.terraform_docdb.endpoint
          MONGODB_PORT     = var.docdb_port
          MONGODB_PASSWORD = var.docdb_password
          MONGODB_USERNAME = var.docdb_username
        }
      }
      image_identifier      = var.image_url
      image_repository_type = "ECR"
    }

    authentication_configuration {
      access_role_arn = aws_iam_role.app_runner_build_role.arn
    }

    auto_deployments_enabled = true
  }

  network_configuration {
    ingress_configuration {
      is_publicly_accessible = true
    }

    egress_configuration {
      egress_type       = "VPC"
      vpc_connector_arn = aws_apprunner_vpc_connector.connector.arn
    }
  }

  instance_configuration {
    cpu               = "1 vCPU"
    memory            = "2 GB"
    instance_role_arn = aws_iam_role.app_runner_build_role.arn
  }

  tags = {
    Name = "terraform-apprunner-service-backend"
  }
}
#What this really does
- pulls your backend image from ECR
- exposes port
8000 - injects runtime environment variables
- enables automatic redeploy on image updates
- sends outbound traffic through the VPC connector
- gives the service an IAM role at runtime
#Important idea
This is not “just deployment.” This is where your application runtime becomes part of your infrastructure model.
8. Private Bedrock Access with a VPC Endpoint
If your backend needs Bedrock, you do not want model calls bouncing through the public internet if you can avoid it.
Use an interface VPC endpoint.
#Bedrock Endpoint Security Group
resource "aws_security_group" "bedrock_endpoint_sg" {
  name_prefix = "bedrock-endpoint-sg-"
  vpc_id      = aws_vpc.chatbot_vpc.id

  ingress {
    from_port       = 443
    to_port         = 443
    protocol        = "tcp"
    security_groups = [aws_security_group.apprunner_sg.id]
  }

  tags = {
    Name = "Bedrock Endpoint Security Group"
  }
}
Only the App Runner service can talk to the endpoint over HTTPS.
#Bedrock Interface Endpoint
resource "aws_vpc_endpoint" "terraform_bedrock_endpoint" {
  vpc_id            = aws_vpc.chatbot_vpc.id
  service_name      = "com.amazonaws.eu-central-1.bedrock-runtime"
  vpc_endpoint_type = "Interface"

  security_group_ids = [
    aws_security_group.bedrock_endpoint_sg.id
  ]

  private_dns_enabled = true

  subnet_ids = [
    aws_subnet.private_subnet_1.id,
    aws_subnet.private_subnet_2.id
  ]
}
#Why this is powerful
With private DNS enabled, your backend can resolve the normal Bedrock endpoint name and still stay inside private AWS networking.
That is cleaner and more secure than exposing unnecessary public paths.
#Endpoint Policy
resource "aws_vpc_endpoint_policy" "terraform_bedrock_endpoint_policy" {
  vpc_endpoint_id = aws_vpc_endpoint.terraform_bedrock_endpoint.id
  policy = jsonencode({
    Version = "2012-10-17",
    Statement = [
      {
        Effect = "Allow",
        Principal = "*",
        Action = [
          "bedrock:InvokeModel",
          "bedrock:InvokeModelWithResponseStream"
        ],
        Resource = "*"
      }
    ]
  })
}
#Production note
This is okay for a learning setup. In a real environment, you would tighten both the principals and the allowed resources.
9. What This Architecture Gets Right
This setup is strong because it separates concerns well.
#1. The database is private
That is the correct default.
#2. Admin access is controlled
The bastion host is a deliberate entry point, not accidental exposure.
#3. The app runtime is managed
App Runner gives you deployment convenience without manually managing EC2 for the app layer.
#4. Model access is treated like infrastructure
Bedrock is not just “an API call.” It is part of the network and security design.
#5. Terraform makes the whole thing reproducible
That means:
- easier collaboration
- easier review
- easier environment replication
- less console drift
10. What I Would Improve Further
If this were evolving from a demo into a stronger production system, I would improve these areas first.
#Secrets Management
Do not keep long-lived database credentials in plain Terraform variables if you can avoid it. Use Secrets Manager or Parameter Store.
#IAM Tightening
Avoid broad managed policies like full access unless absolutely necessary. Use least privilege.
#Remote State
Do not keep Terraform state only locally for collaborative environments. Use remote state with locking, such as:
- S3 for state storage
- DynamoDB for state locking
#Observability
Add logs, metrics, and tracing around:
- backend latency
- Bedrock calls
- database performance
- deployment events
#Environment Separation
Create separate environments for:
- dev
- staging
- production
And keep variables, state, and naming consistent across them.
#CI/CD
Auto-deploy from ECR is useful, but you usually want a clearer pipeline that controls:
- build
- test
- scan
- release
- promotion across environments
11. The Real Lesson
The biggest lesson from this architecture is simple:
a RAG app is not a prompt plus a model.
It is a system.
And once you treat it like a system, you start caring about the things that actually make AI applications real:
- secure data access
- network boundaries
- deployment flows
- secrets
- observability
- reproducibility
- controlled model connectivity
That is the difference between AI demos and AI engineering.
Final Wrap-Up
This Terraform setup is a solid example of how to move from manual AWS clicks to a repeatable, infrastructure-as-code workflow for a RAG chatbot.
At a high level, it gives you:
- a private database layer
- a controlled operational access path
- managed backend deployment
- private connectivity to Bedrock
- reproducible AWS infrastructure in code
And that is exactly the kind of architecture worth studying.
Because the model is only one part.
The system is the product.
#Takeaway
If you want to build real AI products, study this stack less like “Terraform syntax” and more like “system boundaries.”
Ask yourself:
- What is public?
- What must stay private?
- Who is allowed to talk to what?
- Where do secrets live?
- How does the app reach the model?
- How do I reproduce all of this safely?
That is how you stop building AI demos.
That is how you start building AI systems.